Shadows as a Stage: The Art of Tenebrism and High-Contrast Lighting
Tenebrism begins with a radical decision: darkness will not merely surround the subject. It will become the space in which the subject exists. A face, hand, fold of fabric, or polished object emerges from near-blackness as if caught in a sudden beam of light. Everything outside that illuminated area recedes, leaving the viewer with no visual escape from the central action.
This approach is frequently associated with Baroque painting, particularly the work of Caravaggio and artists influenced by his theatrical use of illumination. Yet the tenebrism technique is not limited to historical oil painting. Its principles can be applied to portraiture, digital concept art, 3D rendering, photography, and cinematic lighting. The materials and software may change, but the visual logic remains consistent: suppress ambient information, establish a dominant single light source, and use extreme value contrast to control attention.
Successful tenebrism is not created by filling half the canvas with black paint. It depends on carefully organized values, edges, reflected light, and focal accents. Darkness must appear deep without becoming empty, while illuminated forms must feel solid rather than pasted onto a black background. This balance transforms a simple lighting effect into dramatic shadow painting with psychological weight.
The following guide explains how to build that balance in oil and digital media, how to translate classical Baroque lighting techniques into 3D environments, and how to prepare a finished high contrast painting for presentation to collectors on ViaHonest.

Understanding Tenebrism: Beyond Traditional Chiaroscuro
Chiaroscuro and tenebrism both use light and shadow to model form, but they do not create the same visual experience. Traditional chiaroscuro often relies on gradual transitions. Light moves across the subject through halftones, soft core shadows, and reflected illumination. Even darker areas generally remain readable and integrated with the surrounding environment.
Tenebrism pushes this contrast much further. Large portions of the composition may descend into deep shadow, with only selected forms receiving direct illumination. The transition from darkness to light can be abrupt, especially near the focal point. Instead of describing the entire scene evenly, the artist reveals only what is necessary.
This selective visibility is central to the tenebrism technique. The artist controls not only how the subject looks, but also how much of the subject the viewer is permitted to see. Concealment becomes an active compositional tool. A shoulder can disappear into the background, a hand can emerge without a fully visible arm, and a face can be divided between intense light and almost complete darkness.
Soft chiaroscuro often produces volume, atmosphere, and naturalism. Hard tenebrism produces confrontation. It compresses visual information and creates the impression that a decisive moment has been isolated from the surrounding world. This makes it especially effective for portraits, religious scenes, psychological narratives, crime or horror concepts, and cinematic character studies.
The Pitch-Black Stage Concept
A useful way to understand tenebrism is to imagine the canvas as a dark theatrical stage. Before the light is introduced, the stage is closed and visually silent. The light does not illuminate everything. It selects a performer, gesture, or object and leaves the remaining space unresolved.
The background may appear black, but using pure black everywhere can flatten the image. In a dark background oil painting, greater depth usually comes from chromatic darkness. Mixtures of burnt umber, ultramarine blue, transparent oxide red, ivory black, or deep green can produce shadows that feel richer than a single opaque black pigment. These mixtures also allow subtle temperature changes to remain visible beneath the dominant darkness.
The background should be connected to the shadow side of the subject. If every contour is clearly outlined, the figure may resemble a cutout placed over a dark surface. Allowing selected edges to disappear creates continuity between the subject and the surrounding shadow. This lost-edge effect lets the viewer complete the missing form mentally and increases the sensation of depth.
The shape of the darkness matters as much as the shape of the light. Avoid scattering isolated black patches randomly across the image. Connect the largest shadow masses wherever possible so that they form a coherent structural pattern. Before painting details, reduce the composition to two or three major values and ask whether the illuminated shape remains readable at thumbnail size.
For studio work, place the model several feet away from the backdrop to reduce unwanted reflected light. A matte black or dark brown surface will absorb more light than glossy fabric. Position a single light source above and to one side of the subject, then use flags or dark panels to prevent illumination from spilling across the room.
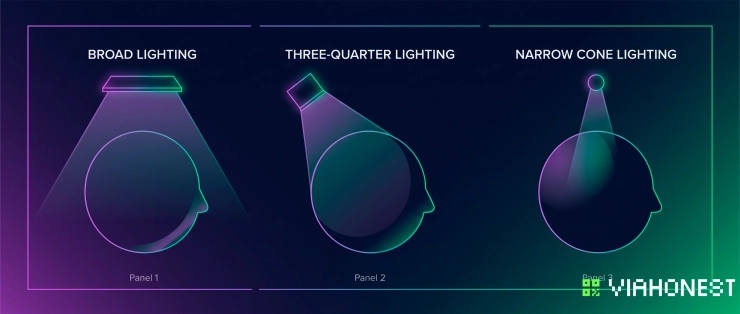
A useful visual accompaniment for this section would compare three lighting diagrams: frontal soft light, conventional three-quarter chiaroscuro, and a narrow side spotlight used for tenebrism. The comparison should show how each setup changes the size of the shadow mass and the visibility of the background.
High-Value Contrast and Psychological Intensity
Value contrast is the primary engine of tenebrist composition. The brightest light attracts the eye first, particularly when it is surrounded by very dark values. This means that a small highlight can carry more visual authority than a large field of middle tones.
The strongest contrast should support the narrative. In a portrait, it may occur around the eyes, forehead, or illuminated cheek. In a figurative scene, it may frame the point where two hands meet. In concept art, it might reveal a weapon, artifact, or facial expression while leaving the environment almost entirely concealed.
Not every light-facing plane should be equally bright. If the forehead, nose, cheek, collar, hand, and background accent all reach the same value, the hierarchy collapses. Reserve the cleanest white or highest digital value for a limited focal area. Secondary illuminated forms should remain slightly darker, softer, or less saturated.
Psychological tension often comes from incomplete information. A brightly illuminated expression surrounded by deep shadow feels immediate because the viewer cannot fully assess the environment. The darkness suggests unseen space, danger, isolation, or spiritual mystery. This is one reason Baroque lighting techniques continue to influence contemporary film and game design.
Color temperature can intensify this effect. A warm cinematic key light against cooler brown-black shadows creates separation without requiring every edge to be sharp. Conversely, cold light falling across warm darkness can produce an unsettling, nocturnal atmosphere. The value structure must remain dominant, but controlled temperature shifts prevent the image from feeling monochromatic or lifeless.
Step-by-Step Technical Guide for Studio and Digital Canvas
The most reliable way to master the tenebrism technique is to build the image from darkness toward light. This sequence encourages restraint. Instead of drawing every form and darkening it afterward, the artist begins with a unified shadow field and reveals only the areas touched by illumination.
Before working on the final piece, create a small value study. Use three values: deep shadow, middle light, and focal highlight. If the composition does not function in this simplified form, additional rendering will not solve the underlying problem.
For digital work, begin with a grayscale thumbnail or temporarily desaturate the image. Color can disguise weak value relationships, particularly when saturated hues appear brighter than they truly are. Checking the painting in grayscale throughout the process helps preserve the intended hierarchy.
Step 1: Laying the Dark Imprimatura
A dark imprimatura establishes the overall value and temperature of an oil painting before detailed modeling begins. It removes the disruptive brightness of the white canvas and allows the artist to judge highlights in relation to an already dark environment.
Prepare a transparent mixture using burnt umber, transparent oxide brown, or a combination of earth pigment and ultramarine. Thin it enough to spread evenly while maintaining a visible stain. Apply the mixture across the surface, then wipe back selected areas with a lint-free cloth to indicate the first light masses. The layer should be lean and stable, not glossy or overloaded with medium.
The ideal value depends on the intended result. A middle-dark brown ground provides flexibility because it can support both deeper shadows and lifted highlights. A nearly black ground creates immediate drama but leaves less room for shadow variation. Artists attempting tenebrism for the first time often benefit from starting slightly lighter than expected, then deepening the darkest passages later.
Once the dark imprimatura has settled, draw the main structure with a thin earth-color line. Avoid outlining every feature. Concentrate on the angle of the head, the silhouette of the illuminated mass, and the placement of the largest shadow boundary. Keep the drawing integrated with the ground so it does not become a separate graphic layer.
In digital painting, create the equivalent with a dark brown, blue-black, or neutral charcoal base layer. Add a new layer for the first light statement, but do not immediately use pure white. Choose a muted middle-light value and block in only the planes facing the source. A textured brush can reproduce some of the visual irregularity of a traditional ground, while a smooth brush is better reserved for controlled transitions and focal accents.
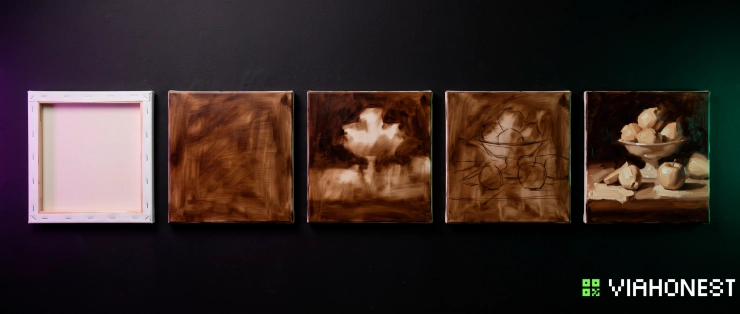
A step-by-step visual sequence should show the untreated surface, the transparent dark imprimatura, the wiped light mass, the structural drawing, and the first opaque light application. Keeping the camera position and exposure consistent will make the progression clear.
Step 2: Carving Form with a Single Directional Light
A single light source creates clarity. When several sources compete, overlapping highlights and conflicting cast shadows weaken the tenebrist structure. In a studio, use a spotlight, focused lamp, or small modifier placed above eye level and approximately 30 to 60 degrees to one side.
Moving the source closer increases fall-off, meaning that illuminated areas lose intensity more quickly as they recede from the lamp. This hard edge fall-off can produce the compact, theatrical illumination associated with dramatic shadow painting. Moving the source farther away creates a more even light level across the subject.
Begin painting the largest illuminated planes as connected shapes. On a face, these might include the forehead, bridge of the nose, upper cheek, and part of the mouth or chin. Do not render pores, eyelashes, or individual strands of hair at this stage. First establish the relationship between the light family and the shadow family.
Build light with increasingly opaque paint. Warm earth colors can form the lower layers, followed by mixtures containing progressively more lead white or titanium white, depending on the desired handling and opacity. Keep thick paint for the highest lights. The physical relief of an impasto accent can catch real illumination and reinforce the painted light.
In digital art, a common mistake is to paint the effect with a soft airbrush on an otherwise fully visible figure. This produces atmospheric shading but not convincing tenebrism. Instead, block the illuminated form with a firm brush, then soften only selected transitions. Use clipping masks or controlled selections if needed, but preserve natural irregularity around anatomical forms.
The light must also obey material. Skin usually carries broader transitions than polished metal. Satin produces sharp, directional highlights, while wool absorbs light and remains relatively subdued. If every surface receives the same highlight treatment, the scene loses material credibility.
Step 3: Managing Shadow Boundaries
The shadow side should remain unified, but it cannot be mechanically flat. Even a deep shadow contains subtle structure created by reflected light, local color, and changes in surface direction. The challenge is to suggest this information without allowing it to compete with the direct light.
Keep reflected light darker than the halftones on the illuminated side. If reflected light becomes too bright, the form appears surrounded by multiple light sources. A narrow temperature shift or slight value lift is often enough to describe a jawline, eye socket, or fold inside the shadow.
Pay close attention to the terminator, the boundary where direct light ends and shadow begins. A sharp terminator can indicate a turning plane, tense structure, or focused source. A softer boundary suggests rounded form or broader illumination. Tenebrism favors decisive separation, but not every transition should be equally hard.
Cast shadows require similar control. Their edges are usually sharp near the object casting them and softer as the distance increases. This change supports spatial depth. A hand casting a shadow across a chest should not create the same edge quality at every point.
Some lighting references use the phrase chagrin shadow to describe a dark, emotionally charged shadow effect, although it is not a standardized technical term in classical painting. For practical purposes, treat such a shadow as a compressed, low-detail region that supports mood while retaining enough internal variation to describe essential form.
Lost edges are particularly important. Let the hair merge with the background, allow the far shoulder to disappear, or suppress the contour beneath the chin. Balance these passages with a few found edges near the focal point. The alternation between visible and invisible contours makes the darkness feel atmospheric rather than simply painted around the figure.
Avoid lifting shadow values late in the process merely to display additional detail. The desire to explain everything is one of the most common reasons a high contrast painting loses its power. If a detail does not strengthen the subject, gesture, or narrative, let it remain hidden.
Refining Color, Edges, and Focal Hierarchy
Once the principal light and shadow pattern is established, refinement should strengthen the hierarchy rather than expand the amount of information. Assess the image from a distance and identify the first, second, and third areas that attract attention. If the eye moves toward an unimportant collar, background prop, or reflected highlight, reduce that area.
Edge variety creates rhythm. Place harder edges around the most important features, then soften transitions as forms turn away or recede. A portrait may contain a crisp edge along the illuminated eyelid and nose while the cheek, hair, and neck dissolve progressively into darkness.
Control saturation as carefully as value. Highly saturated color can become a second focal device, even when it is relatively dark. Keep background colors restrained and reserve stronger chroma for the illuminated subject. Warm skin surrounded by cool darkness is effective, but the temperature difference should remain subordinate to the value contrast.
Use black selectively in oil paint. Overmixing black with every color can produce dull, opaque shadows. Transparent earth pigments, blues, and reds often create more luminous dark mixtures. In digital work, avoid setting every shadow to RGB zero. Near-black colors retain atmospheric depth and provide room for the deepest accents.
Translating Tenebrism to 3D Light Rendering and Concept Art
In 3D rendering, the principles remain the same, but the artist must control systems that traditional painters handle intuitively. Default environments frequently contain substantial ambient light, sky illumination, bounce light, and automatic exposure. These settings reveal too much of the scene and weaken the intended contrast.
Begin by reducing Ambient Light or environment intensity. The model should approach silhouette before the key light is activated. Add one Spotlight as the cinematic key light and position it above and to one side of the subject. Narrow the cone until it isolates the focal region, then adjust softness according to the desired boundary.
A small virtual light source creates harder shadows, while a larger source creates broader transitions. Increase the distance between the subject and background if you want the background to remain black. Use flags, blockers, or negative fill equivalents to prevent indirect illumination from opening the shadow side.
Global illumination should not automatically be disabled, since controlled bounce light helps describe form. Instead, lower its intensity or restrict its influence. The goal is to preserve enough reflected information for volume while maintaining a clear separation between direct light and deep shadow.
Exposure is equally important. Raising exposure to reveal shadows will often clip the highlights and destroy the tenebrist hierarchy. Set exposure for the illuminated focal point, then allow the shadows to fall naturally. Use tone mapping carefully so that compressed values do not turn a forceful contrast pattern into a uniformly gray image.
Concept artists can follow a similar process without rendering a full 3D scene. Start with a dark value field, establish the cone of illumination, and paint only the forms intercepted by it. Consider how the light travels through space before adding local detail. Volumetric haze, dust, or smoke can make the beam visible, but these effects should not overwhelm the subject.
For cinematic compositions, test the image in thumbnail form and on different displays. A shadow that appears rich on one monitor may become completely blocked on another. Preserve essential information slightly above absolute black while keeping the majority of the environment visually quiet.
Common Tenebrism Mistakes and How to Correct Them
The first common mistake is confusing darkness with drama. A painting can be extremely dark and still feel weak if its light shape is scattered or indecisive. Correct this by connecting the illuminated planes and concentrating the highest contrast near the narrative center.
The second mistake is overusing pure white. When every illuminated form reaches the top value, the image becomes harsh and flat. Reserve the brightest accent for a small area and build surrounding lights through controlled steps.
Another problem is excessive soft blending. If every boundary is airbrushed, the subject appears foggy rather than sculptural. Introduce firmer edges where planes turn sharply or cast shadows begin, then use softer transitions only where the form requires them.
The opposite problem is making every edge hard. This separates the figure from the background and eliminates atmosphere. Restore lost edges in nonessential areas, especially along the shadow-side contour.
Finally, avoid placing unrelated highlights throughout the darkness. Each visible accent should have a logical relationship to the single light source. If a highlight cannot be explained by direct or reflected illumination, reduce or remove it.
Showcase Your High-Contrast Artwork
A successful tenebrist work rewards close viewing. Subtle chromatic shadows, layered paint, controlled edges, and concentrated highlights may be difficult to communicate through a casual social media post. Presenting the piece in a dedicated marketplace context gives collectors the information needed to understand both its technique and its value.
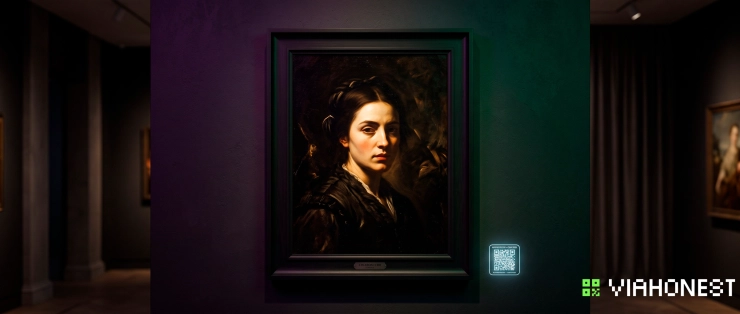
ViaHonest helps independent artists publish original works with professional details, transparent ownership information, and verifiable authenticity. For a dark background oil painting, portrait, digital concept piece, or cinematic character study, the listing can explain the medium, dimensions, lighting concept, process, and artistic intent behind the work.
Artists working with the tenebrism technique are invited to submit dramatic portraits and high-contrast concept art to ViaHonest for consideration in the thematic "Dramatic Light" gallery selection. Photograph or export the artwork carefully so that the shadow detail remains visible, provide accurate technical information, and describe how the single light source shapes the composition.
Verified presentation is especially valuable for original artwork. It helps distinguish a unique finished piece from an unrestricted reproduction and gives collectors greater confidence when evaluating the work. Documented ownership also supports the artwork beyond its first sale, while eligible resale terms can allow the artist to participate in future secondary-market transactions.
Conclusion
Mastering tenebrism means learning to reveal less. The artist begins with darkness, introduces one dominant source, and allows value contrast to determine what the viewer sees first. Dark imprimatura, connected shadow masses, selective highlights, controlled fall-off, and varied edges work together to turn illumination into narrative.
The same logic applies across oil painting, digital concept art, 3D rendering, and cinematography. Reduce ambient light, protect the deepest shadows, expose for the focal highlight, and resist the urge to explain every form. When darkness functions as a stage rather than an empty background, even a narrow beam of light can carry extraordinary emotional force.
Create your own interpretation of dramatic shadow painting, then publish it on ViaHonest for consideration in the "Dramatic Light" selection. Present your work with verified authenticity, a clear artistic statement, and professional documentation so collectors can discover not only a striking image, but an original artwork built to retain its identity and value.